Showing posts with label iCopic. Show all posts

Monday, November 21, 2011

iCopic Weekly Challenge #57 - Thanksgiving

Happy Monday! Wow! I can't believe it's only a few days til Thanksgiving! So it's just perfect for this week's iCopic challenge to be a Thanksgiving theme. I fell in love with this adorable turkey image and sentiment from the Turkey Day set by Lawn Fawn. I couldn't wait to ink it up and create a fun Thanksgiving card. I started off by stamping the image & sentiment with Memento Tuxedo Black Ink on yellow patterned paper. I colored the image with Copic Markers and die cut the image & sentiment out with a Labels 8 Die. I layered the main panel of patterned paper with strips of green and brown patterned paper and added lots of stitching. I adhered the panel to the green cardstock base and adhered the image on top with foam tape. I embellished with green grosgrain ribbon and some subtle sparkle with a stardust gel pen.

Now are you ready to play along for a chance to win a wonderful iCopic prize and to be featured on the iCopic Blog? Be sure to visit the iCopic Blog for the full challenge rules and to link your Challenge Card Entry. Can't wait to see all your fabulous creations!

Copic Colors:
Turkey Body:
E34, E35, R29 and YR68
Turkey Feathers:
E25, E29, Y35, YR09, YR16 and YR23

Thanks for visiting and Have a Super Day!
Rachel Siggy

Monday, November 7, 2011

iCopic Weekly Challenge #55 - Thankful

Hi Pals! Hope you had a wonderful weekend! I'm back again this Monday to host another fun iCopic Weekly Challenge. This week's challenge theme is Thankful. There are so many things in my life in which I am truly thankful. I have been so blessed to make such amazing friends through blogging and I can't thank you all enough for visiting and/or following me through my crafty adventures. I appreciate all your kindness and support, so this week's card is dedicated to all of you!

I chose to use a sentiment instead of an image for the focal point to really highlight the Thankful theme. The lovely "Thank you for being my friend" sentiment is from the Hello Friend set by Lawn Fawn. I wanted all the focus to be on the message, so I dressed it up with some pretty pattern paper and a few embellishments.

I hope you will play along with this week's challenge. It's a great opportunity to win a fabulous prize from iCopic. To play along for your chance to win, just visit the iCopic Blog for the details and to link up your creation. Good Luck!

Thanks for visiting and Have Great Day!
Rachel Siggy
Link

Monday, October 24, 2011

iCopic Weekly Challenge #53 - Orange & Black

Happy Monday! Ready to start the week off with another fun iCopic Weekly Challenge? This week's challenge is an Orange and Black Color Challenge. My card was created using the cute pumpkin image from the Harvest Season set by Lawn Fawn. I added a the little Boo! sentiment from the Heebie Jeebies set by Lawn Fawn too. I colored the pumpkin using the color combination of YR04, YR16 and YR68. I colored in the stem using a Black Spica Pen for lots of shimmer. This challenge is super fun and just perfect for getting you into that Halloween spirit. Now are you ready to play along for a chance to win a wonderful iCopic prize and to be featured on the iCopic Blog? Be sure to visit the iCopic Blog for the full challenge rules and to link your Challenge Card Entry.


We love seeing your challenge cards and I can't wait to see what you create. Have a fabulous Monday and thanks for visiting!

Rachel Siggy

Tuesday, October 11, 2011

Tuesday Tips & Tricks: CAS Christmas

Hello Friends! Welcome to another Tuesday Tips & Tricks! I am your hostess this week over at the iCopic Blog and I thought it would be great to show you some of my favorite tips for quick holiday card making. It's easy to get caught up in the holiday spirit and get behind on your card making. It all goes by so fast and before you know it you are scrambling to make your cards. Don't worry, head on over to the iCopic Blog for some tips and tricks to making your holiday card making easy.

Rachie's Recipe:
Stamps: Christmas Melody Stamp Set (SP and Company)
Ink: Memento Tuxedo Black and Copic Markers
Paper: Kraft & New Leaf (PTI) and Patterned Paper (Echo Park)
Accessories: Black Gems and Foam Tape
Tools: Corner Rounder

Hope you enjoyed today's card and Have a Wonderful Day!
Rachel Siggy

Monday, September 26, 2011

iCopic Weekly Challenge #49 - Red Hair

Hello Friends! I'm your hostess this week for the iCopic Weekly Challenge. This week's challenge is to color red hair. I started off by choosing the super cute Shop Till You Drop stamp by Tutti Cuti. This image is so adorable! I loved her big smile, so I paired the image up with the "You make me smile!" sentiment from the Hello Friend stamp set by Lawn Fawn. So next up was the challenge portion of coloring her hair red. I started off by laying down a base color of E11. Next I built up the color by adding E13, E99 and E18. I blended the colors starting with E99, then E13 and ending with E11. I added some streaks of Y38 to create the final blend and brighten up the hair color to a nice auburn shade. I finished coloring the rest of the image and added in some paper piecing for her hat and boots. I finished the card off by adding some ribbon and a little bit of bling to her hat with a red heart gem. Doesn't she look like a little fashionista?

So are you ready to give this week's challenge a go? Come on and give it a try! I can't wait to see what you all create! There is a prize up for grabs for each weekly challenge. Be sure to submit your entry here at the iCopic Blog for your chance to win. I hope you enjoy this week's challenge! Stop on by the iCopic store to check out the other adorable Tutti Cuti Stamps as well as the new Fall Line of Lawn Fawn sets.

Copic Colors:
Red Hair: E11, E13, E99, E18 and Y38
Skin: E00, E02 & E11
Clothes: R27, R29 and C4, C7, C9
Bags: Y11, Y13, YG23, YG25, R27, R29 and E42

Thanks for visiting and Have a Great Day!
Rachel Siggy

Tuesday, September 13, 2011

Tuesday Tips & Tricks - Divine Twine!

Hello Friends! It's my turn to host this week's iCopic Tuesday Tips and Tricks! So excited to share with you today one of my favorite iCopic products... Divine Twine! The name could not be more perfect to describe this fabulous product. It has many basic uses for hanging tags, tying up packages and stitching, but today's card focuses on it's most fun use as an embellishment. I started off my card by using the super sweet Sew Lovely set by Lawn Fawn. I stamped out 3 spool images onto Kraft cardstock, cut out each image and wrapped Cotton Candy Divine Twine around each spool. Just adding the twine makes the spools really pop! It's such an easy embellishment to add to your cards, but this simple embellishment can easily be transformed into a gift. Be sure to check out my little gift giving tip over at the iCopic Blog.


Stop by iCopic to view their wonderful selection of Divine Twine. It's such a great product. I know you will love it. I know I sure do!

Thanks for visiting and Have a Divine Day!
Rachel Siggy

Monday, August 29, 2011

iCopic Weekly Challenge #45 - Water

Hello Friends! Happy Monday and Welcome to another fabulous iCopic Weekly Challenge. This week's challenge is a fun one. The challenge is to color some water (make a water scene, use an image with some water on it, or have your image look like it is under water, etc.). I knew that the adorable Mermaid Anya from The Greeting Farm would be just perfect for this challenge. I think one of the quickest water backgrounds you can make is an under water background. I simply die cut an oval from X-Press It Blending Card Paper and colored the under water background using B11, B13, B15. The Mermaid Anya image is going to be covering the center of the background once she is layered on top, so you will only need to color the outer edges of the die cut oval to create the background. I started off by laying down the base color around the edges using B11. I added dots of B13 and B15 onto the B11 base color and blended them with another layer of B11. I then used the Colorless Blender to add more dots. I used this dotting method to create the look of bubbles, as I would imagine Mermaid Anya would be surrounded by bubbles under water. It's a very easy and fun technique. Now are you ready to play along for a chance to win a wonderful iCopic prize and to be featured on the iCopic Blog? Be sure to visit the iCopic Blog for the full challenge rules and to link your Challenge Card Entry.

Copic Colors:
Skin: E000. E00, E11, E21
Hair: E25, E31, E50
Clothing & Eyeshadow: YG23, YG25 and V05, Vo6
Background: B11, B13, B15

Thanks for visiting and Have a Super Day!
Rachel Siggy

Friday, August 19, 2011

iCopic All About Children Blog Hop!

Hello Friends! Happy Friday! Welcome to the iCopic All About Children Blog Hop! You should be arriving here from Michelle's blog, if not, please head back to the iCopic Blog where our hop begins. You won't want to miss any of the wonderful projects along the way.

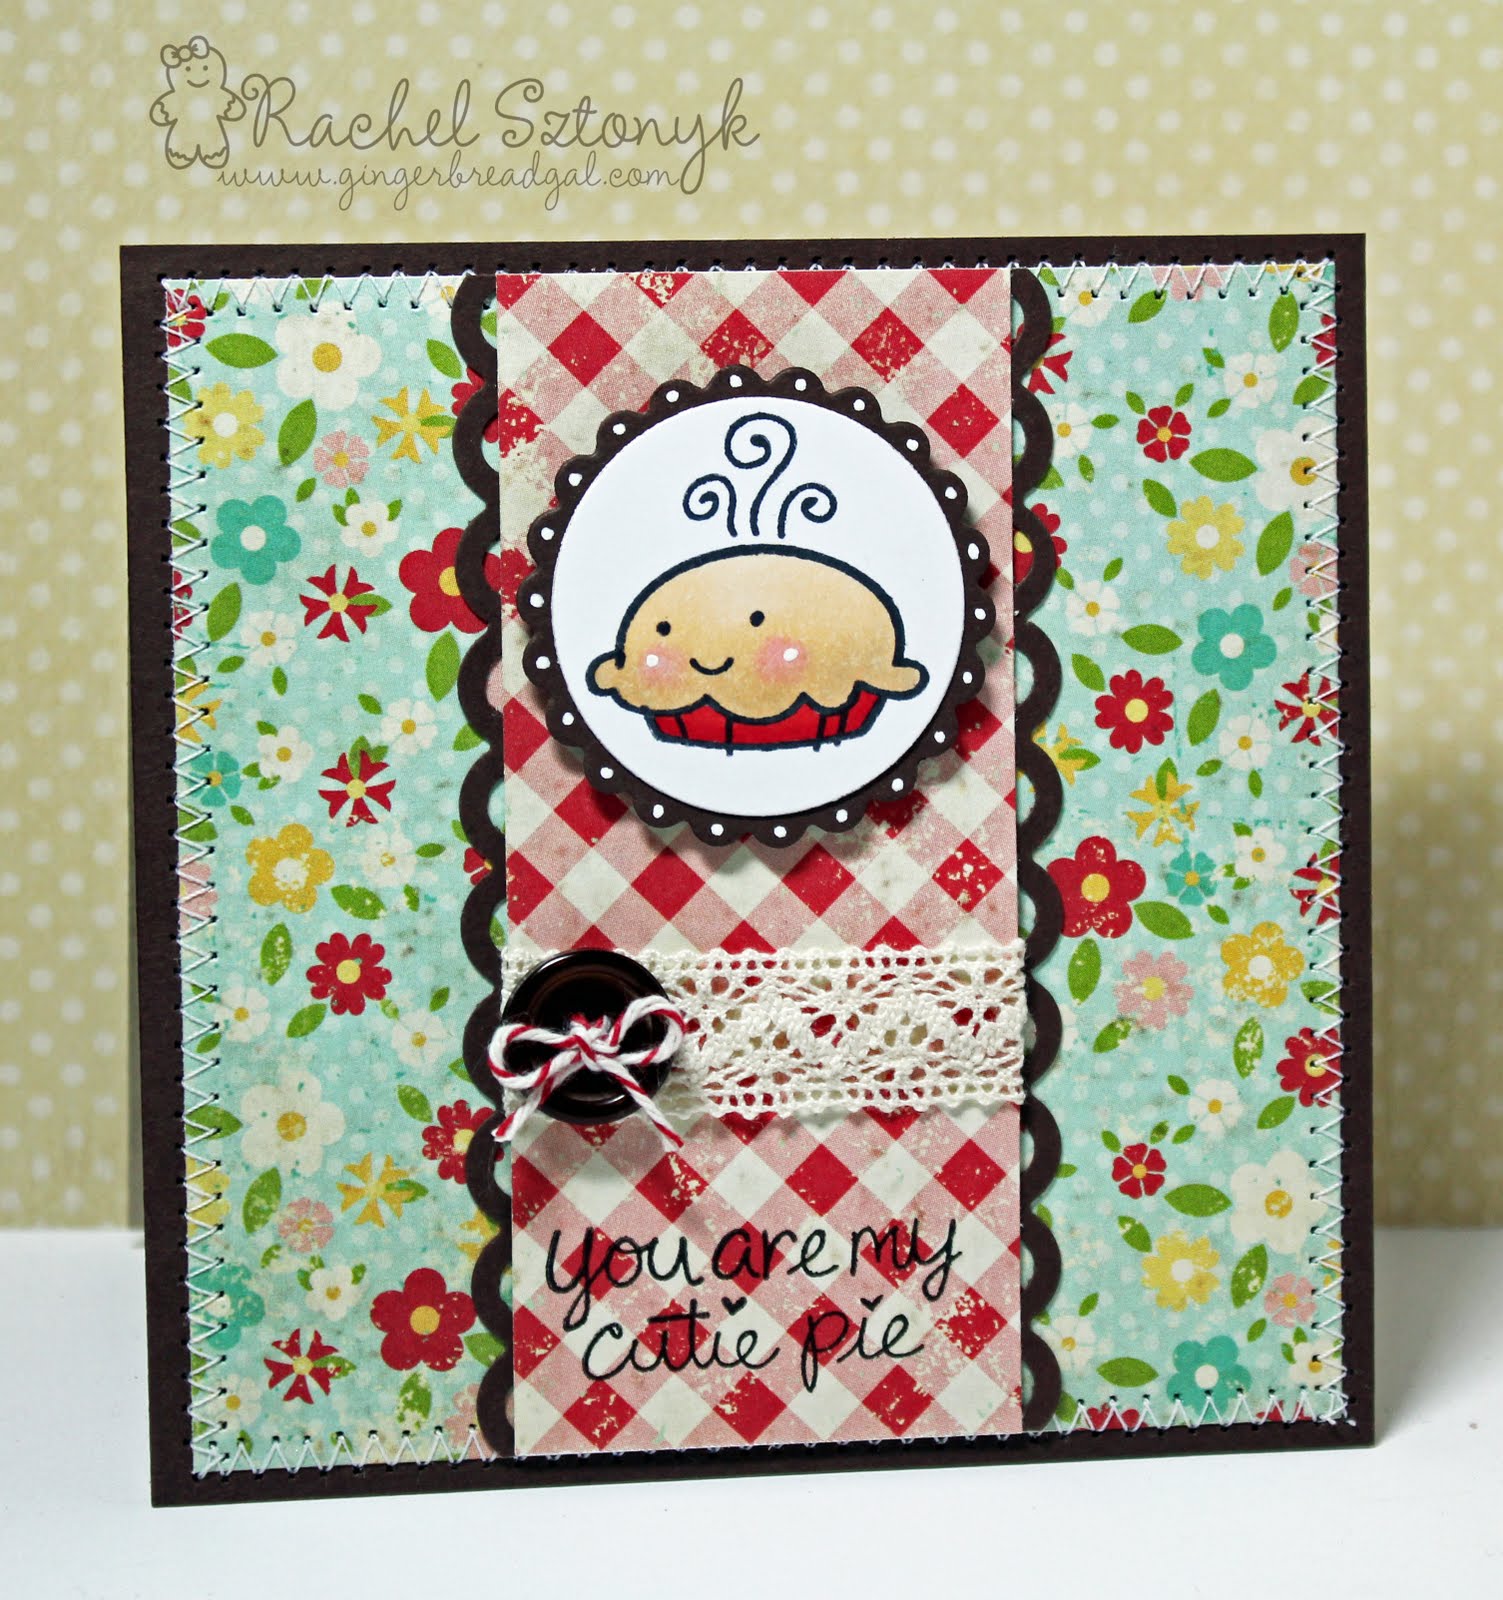
Today I am sharing one of my favorite images from Lawn Fawn's My Silly Valentine Set. I honestly don't think this cutie pie image could be any sweeter. This adorable stamp set is not just for Valentine's Day. It's a perfect everyday set to let the ones you love know you are thinking about them. Don't we all just love to shower children with love and affection? Wouldn't it be a sweet surprise for your little one to open up his or her lunch box and find a card from you inside? I had that just in mind when I created this 4-1/4" square card. I stamped the cutie pie image onto X-Press It Blending Card Paper with Memento Tuxedo Black Ink. I colored the image using E51 & E53 for the pie and R27 & R29 for the pie plate. I cut out the image using a circle die, cut out a brown cardstock mat using a scallop circle die and adhered the image onto the mat. I added some white dots to the image for highlights and to the scallop circle mat. I assembled the card and finished it off by stamping the sentiment, adding a small piece of ribbon and a cute button with some Cherry Divine Twine.

Thanks for visiting! Now be sure to hop on over to Dana's Blog to see her fabulous creation. iCopic is also offering up some wonderful prizes for our blog hoppers, so be sure to leave me a comment and play along with our All About Children Challenge.

Happy Hopping and Have a Great Day!


Rachel Siggy

Tuesday, August 16, 2011

Tuesday Tips & Tricks - Quick & Easy Card Making

Hi Friends! It's my turn to host this week's Tuesday Tips and Tricks over at the iCopic Blog. Well it may only be August, but the holiday season will be here before you know it. It never fails every year I find myself with some last minute gift giving to do and even worse I also find I am short on cards. This year I found the perfect solution with these wonderful new 6x6 papers available at iCopic. Have you seen this wonderful line of 6x6 paper pads by First Edition? I immediately fell in love with them and wanted to create something with them right away. I was blown away not only with the quality of the paper but with the wonderful prints too. The Festive Treats Paper Pack Pad had me at Gingerbread, but it was this adorable single sheet of glittery patterned paper that first caught my eye. The sheet contained 4 single images that were easily cut down into 3"x3" squares leaving 4 perfect main images for card making. So today I am bringing you my trick for quick and easy card making featuring patterned papers. Be sure to visit the iCopic Blog for the full details.

Thanks for visiting and I hope you enjoyed today's cards. Be sure to drop by the iCopic store to see the wonderful selection of patterned papers they carry. I am sure you will want to keep some on hand for your last minute card making.

Thanks for visiting and Have a Fabulous Day!
Rachel Siggy

Monday, August 1, 2011

iCopic Weekly Challenge #41 - Wavin' Hello!

Happy Monday! Hope you had a fabulous weekend! It was a hot one here in Cali, so you can see why I had this cutie on my mind for card making. This week's iCopic Challenge is Skin Tones. If you are used to coloring lighter skin tones then challenge yourself to coloring a darker skin tone and vice versa. I wanted to color this super cute Surfer Anya image by The Greeting Farm closer to my own skin tone during summer. I also colored her hair to match with some serious Sun In getting sprayed in for highlights. I always wanted to do that, but my mom was not having it at the time. So Anya gets to rock the highlights for me! I seriously do wish I had her abs. LOL! Surfer Anya was a blast to color and she looks stunning in every skin tone. I simply used two colors to achieve her gorgeous tan - E11 & E13. Easy Peasy! I hope you will play along with this week's challenge. It's been great seeing someone win a fabulous iCopic prize each week. To play along for your chance at winning just visit the iCopic Blog for the details and to link up your creation. Good Luck!


Copic Colors:
Skin: E11 & E13
Hair: E53, E25, E59 & E49
Swim Suit: R81, R83, RV55, YG23 & YG25
Flower: Y11, Y13 & Y15
Surfboard: Y11, Y13, Y15, RV09, RV17

Rachel Siggy

Monday, July 18, 2011

iCopic Weekly Challenge #39 - Congrats!

Happy Monday!!! Did you all have a wonderful weekend? Mine was great and I was so happy to have such a nice relaxing Sunday. I am back to share with you another fab iCopic Weekly Challenge. This time up the challenge is to only use pastel colors. What a great one for me this week as I have a few friends who are expecting. So excited for my friends and happy to get a lot of use out of this adorable Plus One set by Lawn Fawn available at iCopic. The images are all so sweet and if you missed my previous iCopic Challenge Card using Plus One you can check it out here. I love CAS cards and since the image is so cute I wanted to focus on it. I stamped the image & sentiment onto X-Press IT Blending Card Paper using Memento Tuxedo Black Ink. This cardstock is fantastic for coloring with Copics. I colored in the image using the following Copic colors: Moon (Y11,Y13), Small Star (BG000, BG01) & Large Star (V000, V01). Next I die cut the image & sentiment out along with a matching blue mat. I embossed the bottom layer of plum cardstock with dots and adhered it to the card base. I added my layers onto the plum cardstock with foam tape and added the ribbon bow to the base. I finished off the card with some sparkle by adding a clear gem & glitter to the image.

Are you ready to try your hand at the Pastel Challenge? I have been seeing some AMAZING challenge creations over at the iCopic Blog. You guys ROCK!!! I can't wait to see what you come up with for this one. As always iCopic is offering up a chance to win a terrific prize for this challenge. To get all the details and to enter please visit the iCopic Blog.

Thanks for visiting and Have a Great Day!
Rachel Siggy

Rachie's Recipe:
Stamps: Plus One (Lawn Fawn)
Ink: Memento Tuxedo Black and Copic Markers
Paper: X-Press IT Blending Card Paper, Lavender Moon & Lemon Tart CS (PTI) and Patterned Paper (Memory Box)
Accessories: Stardust Stickles, Clear Gem (Kaiser), Labels 8 Dies (Spellbinders), White Gel Pen and Foam Tape (Best Creation)

Tuesday, July 5, 2011

Hi Friends! It my turn to bring you this week's Tuesday Tips and Tricks at the iCopic Blog! Have you ever found yourself searching for the perfect matching embellishments for your projects? You look through all your supplies and find you have every other color except the one you need. Well here comes Copic markers to the rescue. One of my favorite features about Copic markers are their ability to color on multiple surfaces. Did you know you can create your own custom colored pearls and gems for your projects? Just select the color you need from the wonderful array of Copic markers and color directly over any white pearl or clear gem. It's that easy! Today's projects show just how easy it is to create your own custom embellishments using those fabulous Copic markers available at iCopic.

Have you all seen the iCopic July Release of these adorable new Wild Rose Studio stamps? My card features the super sweet Milton with Barrow stamp. Isn't Milton the cutest? These images are so fun to color and embellish. I wanted to embellish the center of the flowers, but of course I did not have yellow pearls or gems. So I just whipped up my own by coloring with Y18 over tiny white pearls. Woo Hoo! ~ instant yellow pearls!

Next up, I thought we should have a little Christmas in July! Here's a little sneak peek to of my project. Be sure to visit the iCopic Blog for the full details. It really is so quick and easy to create your own custom embellishments. I hope you give it a try!!! Remember all your favorite Copic colors are available at iCopic at an incredible price.


Thanks for visiting and Have a Great Day!
Rachel Siggy

Monday, June 20, 2011

iCopic Weekly Challenge #35 - Thanks Friend!

Happy Monday! Are you ready for another great iCopic Weekly Challenge? This challenge happens to be a favorite of mine. The challenge is to color on something other than smooth white paper. Just think Kraft, Vanilla, Watercolor, Textured or any other kind of paper you can think of other than smooth white. I am pretty sure you can guess by now how much I love Kraft paper. I really love to use my Copics to color on Kraft. The darker paper gives your coloring a deeper richer look. For my challenge card I decided on using the adorable Critters in the Forest set by Lawn Fawn. I just knew the raccoon and log would look great colored on Kraft cardstock. I started off by coloring the log using a trio of browns (E34, E35 & E37) and colored the leaves in using (YG23 & YG25). Next I colored that cute raccoon using a trio of warm grays for the body (W1, W3 & W5) and colored his face using cool grays (C4, C7 & C9). Using the warm grays and kraft paper really gave the raccoon that perfect blend of gray & brown fur. I added just a touch of white to his face to highlight the eyes. Isn't he too cute? Ready to play along for a chance to win a wonderful iCopic prize and to be featured on the iCopic Blog? Woo Hoo! Be sure to visit the iCopic Blog for the full challenge rules and to link your Challenge Card Entry. Happy Stamping!

Can't wait to see your fabulous entries! Have fun and thanks for visiting!
Rachel Siggy

Rachie's Recipe:
Stamps: Critters in the Forest (Lawn Fawn)
Ink: Memento Tuxedo Black and Copic Markers
Paper: Kraft, Dark Chocolate & Enchanted Evening CS (PTI) and Patterned Paper (Bo Bunny)
Accessories: Buttons (PTI), Grass Border Punch (MS), 3D Foam Tape (Best Creation) and Signo White Gel Pen.

Monday, June 6, 2011

iCopic Weekly Challenge #33 - Brown Hair

Hi Friends! Welcome to another fun iCopic Weekly Challenge. This week the iCopic team is challenging you to pull out those gorgeous browns and show off you brown hair coloring skills. My card features the darling Gorjuss Rubber Stamp - GJ Waiting. This image is simply perfect for this week's challenge. I love the details in the hair for this image. It makes it so easy to color, add highlights and feature strands. I have followed the finished card with a color step by step guide. Each step adds a new color and each new color is blended out by the previous lighter color. Let's get started...


Hair coloring is fun and we sure hope you will join us for this week's challenge. Be sure to visit the iCopic Blog to upload your challenge card for a chance to win a great iCopic prize. Have a wonderful Monday and I am looking forward to see your gorgeous hair coloring!

Copic Colors: Skin: E50, E00, E11
Clothing: BG11, BG13, E53, E57,E59, RV14, RV25, YG23, YG25
Hair: E31. E34, E35, E37, E59

Thanks for visiting and Happy Stamping!
Rachel Siggy

Stamps: DJ Waiting (Gorjuss) and Sentiment (Lawn Fawn)
Ink: Memento Tuxedo Black and Copic Markers
Paper:
X-Press IT Blending Card Paper (Copic), Dark Chocolate & Raspberry Fizz CS (PTI) and Patterned Paper (Prima)
Accessories: Ribbon (Creative Impressions), Oval & Scallop Oval Nesties and 3D Foam Tape (Best Creation)

Monday, May 23, 2011

ICopic Weekly Challenge #31 - Shadows

Happy Monday! Welcome to another wonderful iCopic Weekly Challenge. This week's challenge is a great one. One I know that has challenged us all at one time or another and that is shadows. Shadows are key in so many ways. They ground our images and make them come to life. I chose the Plus One stamp set by Lawn Fawn to demonstrate. It's not only a super cute set, but the oven is a perfect image to use for this week's challenge. Let's go step by step.

Step 1: I started off by picking my light source to be on the right hand side. I then lightly drew an outline of how I imagined the shadow would be cast using W1. As you can see I added the shape of the top of the oven just to give it more of a realistic shadow.


Step 2: I then added in the cast shadows closest to the image on the left hand side and underneath the oven using W3.


Step 3: I blended out the cast shadows with W1 and then blended out the entire outline of the shadow with the colorless blender to soften the edges.

Hope you have fun creating shadows! iCopic has lots a great stamps and of course those wonderful Copic markers to get you shadowing. They also have in store a wonderful Shadows & Shading guide book to further develop your skills. It's a great resource to have. Hope you will join us for this week's challenge. We always look forward to seeing your creations! Be sure to visit the iCopic Blog for the challenge rules and to link up your challenge creation.

Thanks for visiting and Have a wonderful Monday!
Rachel Siggy

Rachel's Recipe:
Stamps: Plus One (Lawn Fawn)
Ink: Memento Tuxedo Black and Copic Markers
Paper: X-Press IT Blending Card Paper (Copic), Aqua Mist CS (PTI) and Patterned Paper (MME)
Accessories: Cotton Candy Divine Twine, Button (Cosmo Cricket), Ribbon (American Crafts), Sewing Machine, Stardust Stickles and 3D Foam Tape (Best Creation)

Copic Colors: 0, C1, C2, C4, E51, E53, R81, R83, RV17, RV19, W1 , W3

Monday, May 9, 2011

iCopic Weekly Challenge #29 - Coloring with Red

Hi Friends! So excited to bring you my very first iCopic DT project. I am delighted to be a bi-weekly designer for iCopic and look forward to bringing you all the latest goodies from iCopic. Let's start the week off right with another fabulous iCopic Challenge. This week's challenge is to use reds for coloring. Lipstick Red (R29) was one of my very first Copic markers. I fell in love with that vibrant and rich color and I couldn't resist bringing home some friends for R29 with the wonderful prices they have at iCopic.

The inspiration for today's card came from my darling niece and nephew. These fun loving twins will be graduating from Kindergarten this month and will be off to the wonderful world of First Grade in August. I wanted to let them both know how proud I am to be their Auntie, so I created this card for them. To start I stamped the sweet little apple image from the My Silly Valentine set by Lawn Fawn on X-Press It Blending Card Paper with Memento Tuxedo Black Ink. I began coloring by laying down my base color for the apples using R24. I chose my light source to come from the right and began shading the left side using R27 and using R24 to blend. I finally added my deepest shadow using R29 and blending it out with R27 and then R24. The following pictures layout the 3 step coloring with red process. My final coloring was done on the leaves using Y23 and Y25. I also added a little shading to my finish card around the image using Vintage Photo Distress Ink. The fabulous Distress Inks will be coming available at the iCopic store beginning this week. Woo Hoo!!! I hope you will play along with this week's challenge for your opportunity to win a fun prize from iCopic. Be sure to visit the iCopic Blog for the challenge rules and to link up your challenge creation. I can't wait to see what you create using those gorgeous reds!


Thanks for visiting and Have a Happy Monday!
Rachel Siggy

Rachel's Recipe:
Stamps: My Silly Valentine (Lawn Fawn)
Ink: Memento Tuxedo Black and Copic Markers
Paper: X-Press IT Blending Card Paper (Copic) & Kraft, Dark Chocolate, Pure Poppy CS (PTI) and Patterned Paper (MME & Bo Bunny)
Accessories: Circle & Scallop Circle Nesties, White Gel Pen, Sewing Machine, Piercing Tool (Making Memories), 3D Foam Tape (Best Creation), Red Brads (Creative Impressions) and Cherry Divine Twine

Saturday, April 16, 2011

iCopic DT Call - I heart Pink!


Hi Friends! Here to share with you my creation for the iCopic DT Call. The DT Call Challenge is to create one project using the color Pink! I had promised a cupcake creation, so I thought it was only perfect to create a Jumbo Pink Cupcake for the challenge. The perfect stamp was of course the Cling Cupcake XL by Stampendous. I used R81, R83 and R85 to color the cupcake. I took my time and colored the image in sections to keep the coloring and blending consistent. I paired up the cupcake with one of my all time favorite pattern papers from MME as the cupcake liner. Those polka dots are too cute to resist. I added the fun Happy Birthday sentiment using the Bday Messages set from Stampendous. Topped it all off with lots of sugar using 2 different multi crystal glitters from Stampendous. I also added some Kraft paper too to play along with my sweet friend, Jeanie's, 50th TKT Challenge. Wow! I hope you all love this sweet Pink Cupcake!

I am super excited for a chance to be part of iCopic DT. They offer a wonderful line of products and great customer service. Be sure to stop by and visit them here. You also will be happy to know they also have a great blog too with lots of fun challenges for all us Copic lovers. Coloring with Copics is so fun and I love, love, love them!♥♥♥

Hope you enjoy the card and thanks so much for stopping by today! Hugs!


Thanks for visiting and Happy Stamping!
Rachel Siggy