Sunday, July 31, 2011

12 Days of Christmas / Halloween in July - Day 12 & BLOG CANDY!

Hello Friends! It's the FINAL DAY - DAY 12 of the 12 Days of Christmas/Halloween in July. I had a great time showing you some of the new items just released by Stampendous. I saved the best for last. This is my favorite card that I made for the July catalog. The new Silver Halo Mix which is available with the Treasures Glitter Kit is my favorite glitter hands down. This is a MUST HAVE! The sparkle is incredible and I honestly could not stop staring at the sparkle! It truly is the most dazzling glitter I have ever used. I also am over the moon for the NEW Cling Magical Snowman and Cling Seasons Post stamps. This sweet snowman is my fav NEW image and that sentiment is just gorgeous. I also can't forget about the beautiful Cling Music Score. All of these stamps worked together so perfectly to create the vintage inspired look. Thank you so much for following me along on this series. I appreciated all your sweet comments. It brought me great joy to see how much you loved the new releases. Hugs to you all!


Well this series would not be complete without some Blog Candy! Here are the 4 prizes up for grabs. Woo Hoo! Simply leave a comment on this post telling me what your favorite NEW Stampendous Product is to be entered for a chance to win. You have until Saturday - August 6th to enter and the winners will be announced on Sunday, August 7th! Good Luck!


Thanks again for joining me and Have a Stampendous Day!
Rachel Siggy

Saturday, July 30, 2011

12 Days of Christmas / Halloween in July - Day 11

Hello Friends! Welcome back to the 12 Days of Christmas / Halloween in July - Day 11. Sorry for the break in our regularly scheduled programming, but I was so inspired by this gorgeous card here that I had to create one of my very own. My friend, Wanda, is so talented and when I saw her card I was completely taken with it. I knew instantly which new set I wanted to ink up. These darling angels from the Cling Angel Kisses Set have the sweetest faces and I love their vintage look. I also kept it Krafty, by playing along with the That's Krafty Thursday Challenge. The Kraft carstock base allowed me to really show off the pretty lavender and red color combo. I also got to play with 2 of my favorite accessories - Glitter & Fun Flock. I really hope you have enjoyed this series as we wrap it up tomorrow with Day 12. Please be sure to join me tomorrow for Day 12 and the Blog Candy Giveaway!


Here's a little up close shot, so you can see all the Stampendous Flock & Glitter Goodness! Just double click on the photo for more detail :)

Thanks for visiting and Have a Stampendous Day!
Rachel Siggy

Taylored Expressions July Key Ingredients

Hey there! Just popping in to share with you another Taylored Expressions July Key Ingredients creation. I have really enjoyed this month's kit and I hope you have too. Today's card is also featured as an Inspiration Sheet at the Key Ingredients site which contains the complete supply list and instructions. Inspiration sheets are just another wonderful benefit of the Key Ingredients Subscription. I love the pairing of the July Key Ingredients Kit and the Fresh Flowers stamp set. You can easily make a set of note cards for yourself or as a gift. The generous supply of cardstock, patterned paper and embellishments in each kit allows you to create several items. Don't you just love that?


Be sure to check out all the July Key Ingredients' Inspiration Sheets here. The rest of the design team has provided some wonderful creations to spark your creativity. Thanks for joining me today and have a splendid Saturday!

Rachel Siggy

Thursday, July 28, 2011

12 Days of Christmas / Halloween in July - Day 10

Hi ya! Well we are rapidly approaching Day 12. A lit sad to see it ending so quickly, but excited to share with you all the NEW everyday images from 
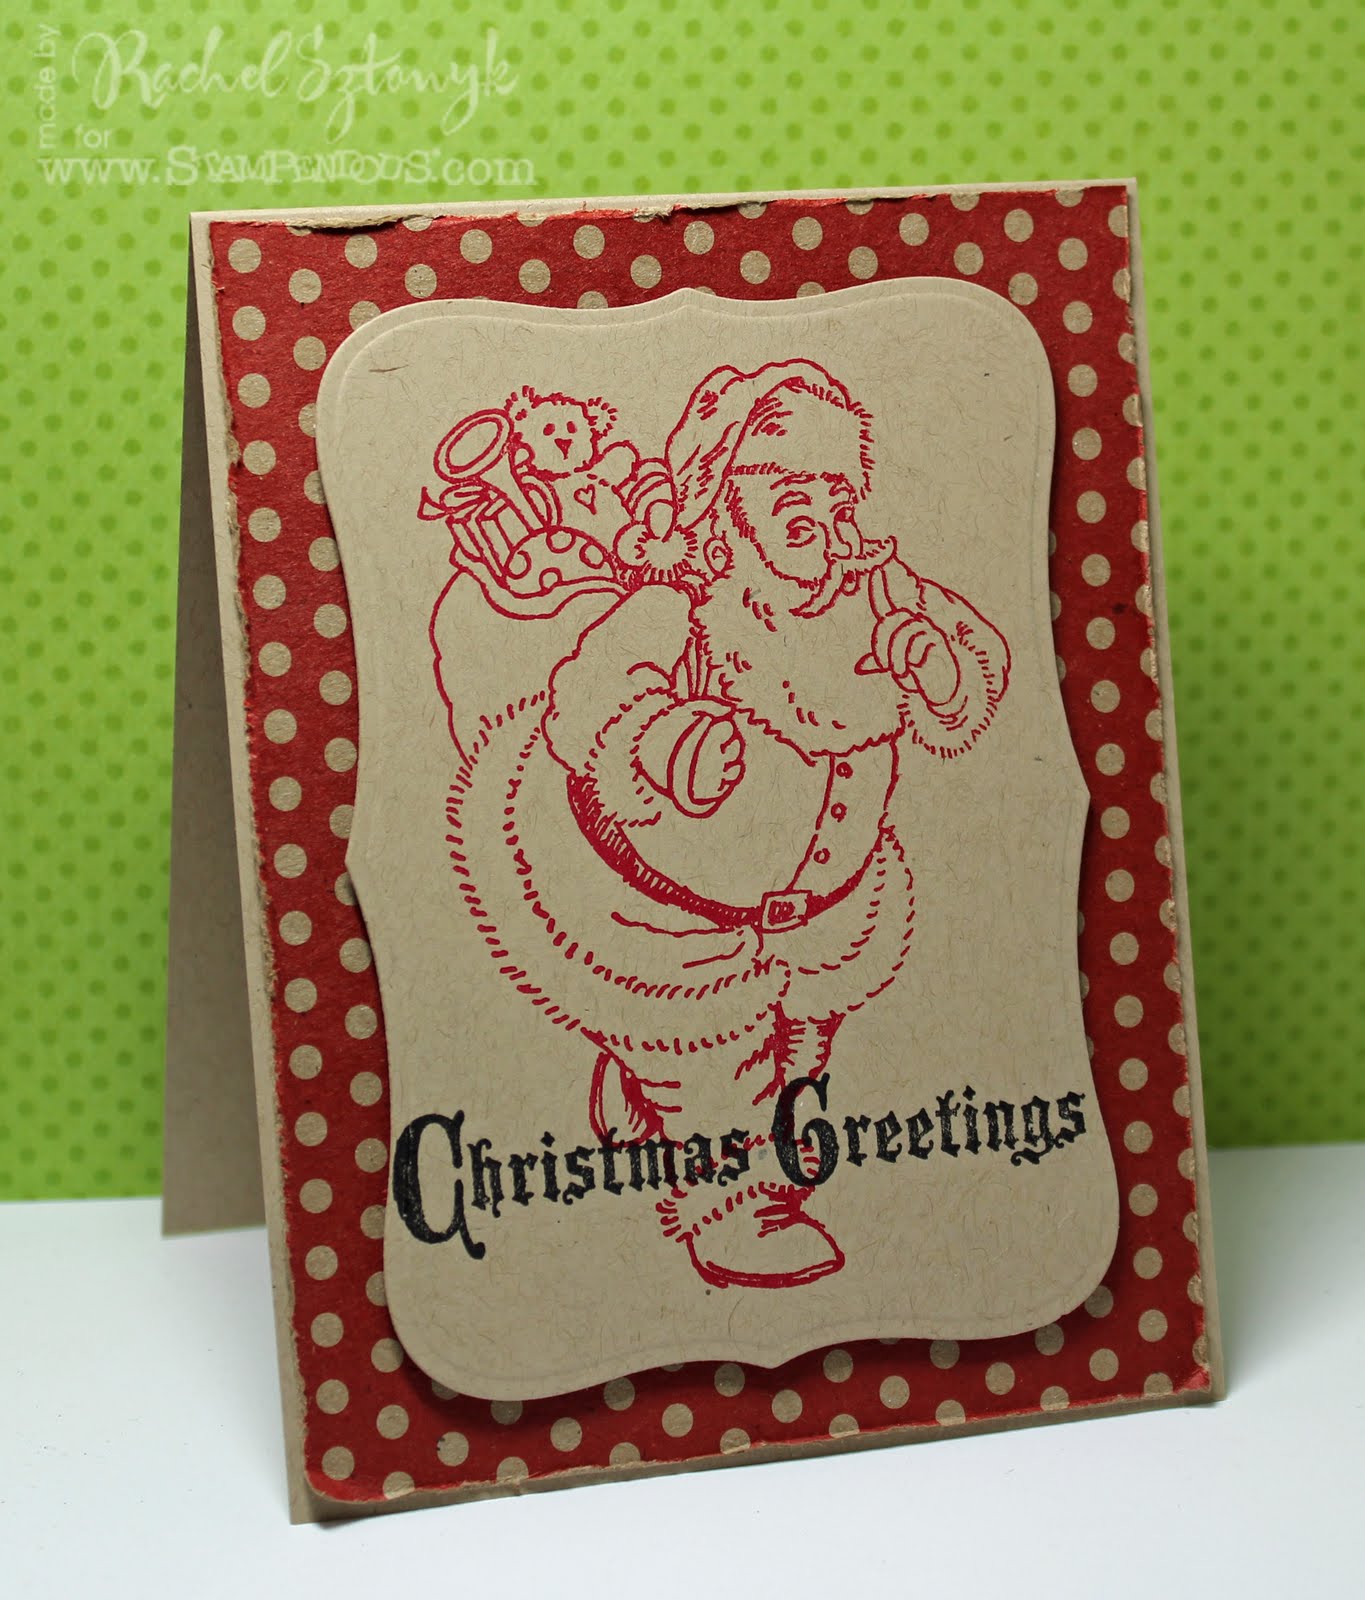
Stampendous. I know I promised some more new images, but I got to share one of my favorite Changito images from the Changito Snow Play Perfectly Clear stamp set. I wanted to create a quick and easy cocoa holder for mass producing. I simply cut a piece of red cardstock 5"x12" and scored it at 4" and 8". I folded it together and added a strip of scor-tape to the bottom and the back panel to close. Simply pop in a bag of cocoa, add your stamped image to the front panel and close with a ribbon bow. You can also slide in a candy cane too. Join me again tomorrow for Day 11. See you then!


Instructions:
1.) Cut a piece of red cardstock 5" x 12" then score at 4" and 8".
2.) Fold red cardstock at score lines and tape close at bottom and one side to create pouch.
3.) Die cut blue cardstock mat.
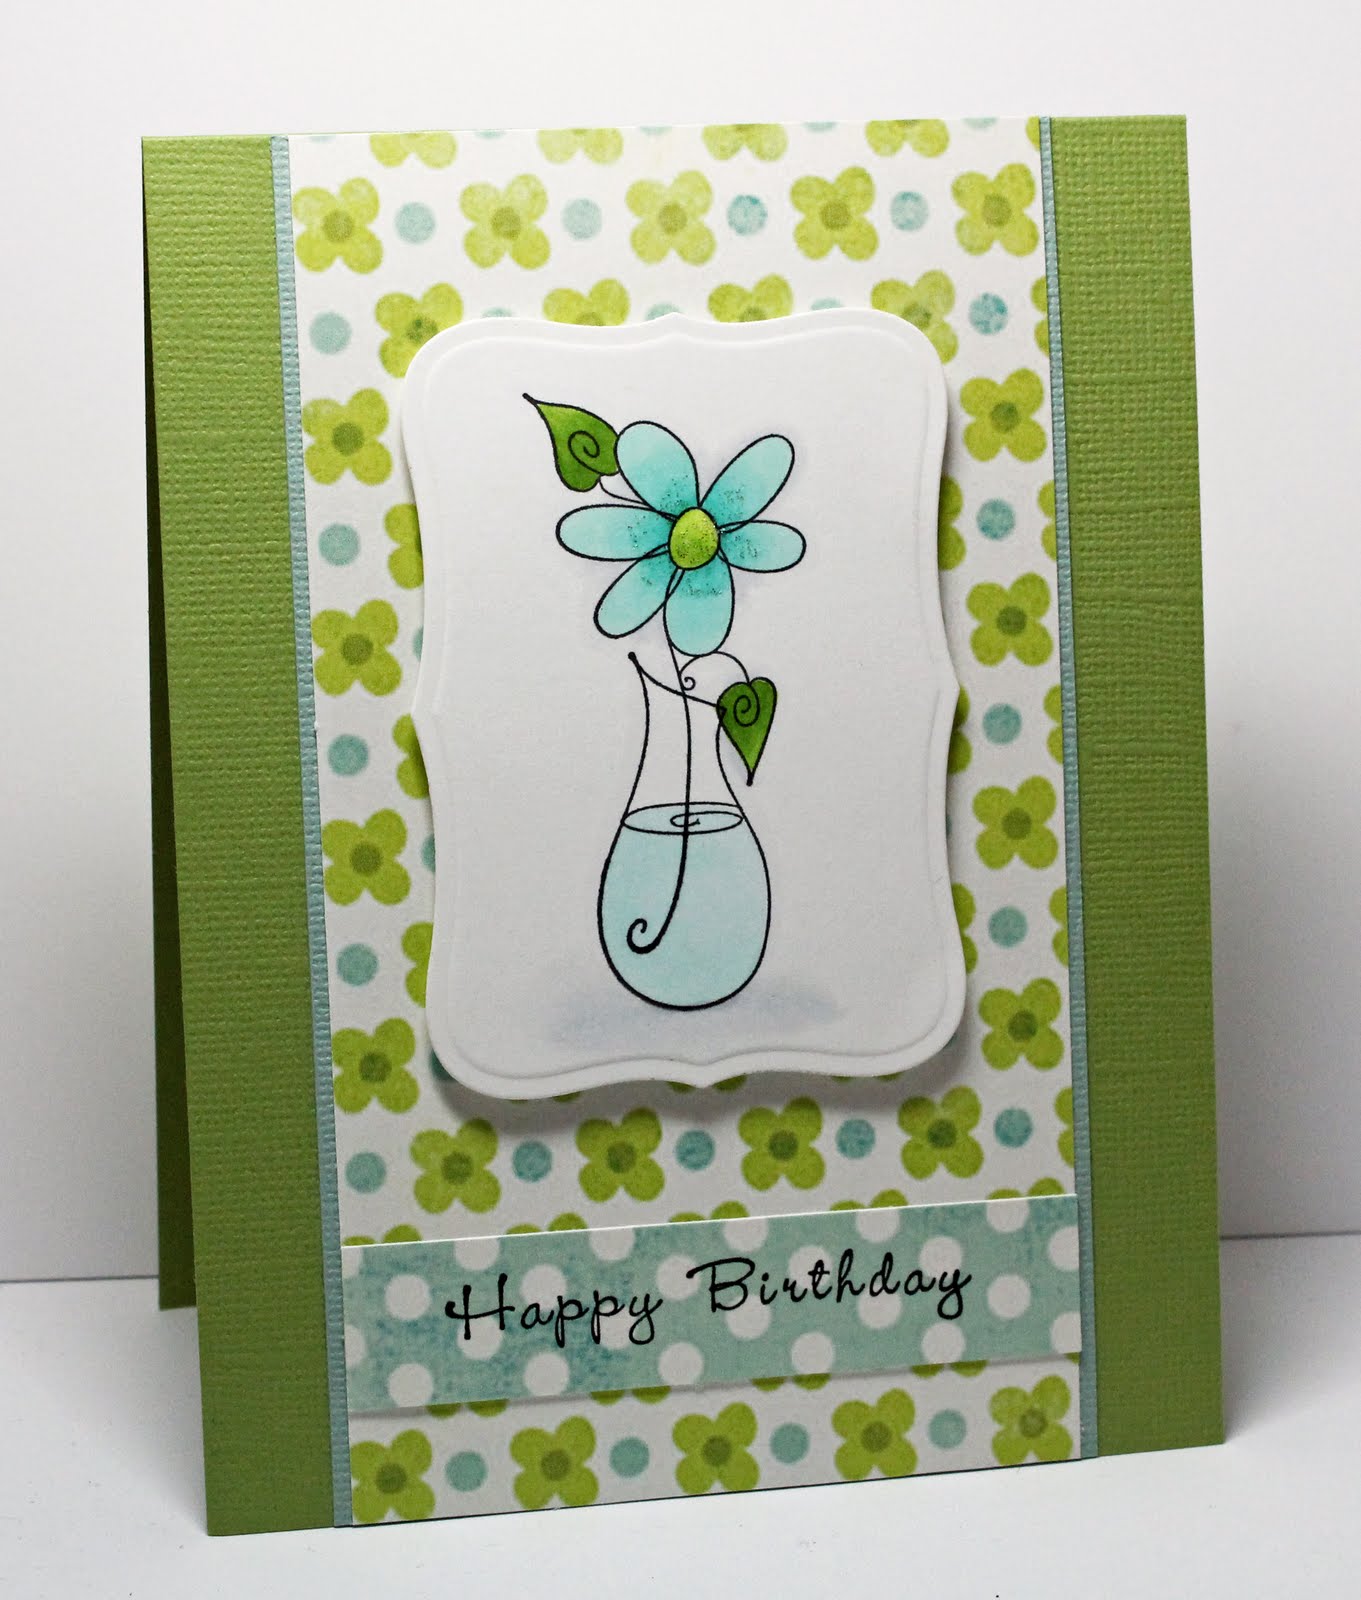
4.) Stamp image onto white cardstock, color, die cut and adhere to blue cardstock mat with foam tape.
5.) Punch hole at top & bottom of blue cardstock mat, run ribbon through and adhere to pouch with foam tape.
6.) Tie ribbon into a bow and add button to ribbon with twine.
7.) Add White Cotton Ball Fun Flock to hat of stamped image.

Supplies:
Stamps: Changito Snow Play Perfectly Clear Stamps (Stampendous)
Paper: Phoenix Dotted Swiss and Swimming Pool CS (Bazzill) and X-Press IT Blending Card Paper (Copic)
Ink: Memento Tuxedo Black (Tsukineko) and Copic Markers
Accessories: Labels 10 Dies (Spellbinders), White Cotton Ball Fun Flock (Stampendous), Ribbon (Creative Impressions), Button (Cosmo Cricket), Cherry Twine (Divine Twine), Scor-Tape and Foam Tape (Best Creation)
Tools: Scor-Pal

Thanks for visiting and Have a Stampendous Day!
Rachel Siggy

Wednesday, July 27, 2011

12 Days of Christmas / Halloween in July - Day 9

Hey Everyone! It's Wednesday and Day 9! Woot Woot Wednesday! We are half way to the weekend. Can you tell I live for weekends? LOL! I thought to celebrate this wonderful Wednesday I would bring some sparkle. Wow! I love purple and these purple witch boots just dazzle from the Violet Pearl Glitter. Don't you just love that sentiment too? The Cling Bootiful Boots Set is a great Halloween set to have. I'm also crazy for that fun Cling Frightful Phrases background stamp. I can't wait to send these Halloween cards out to the gals. They are gonna love all the glitz. Halloween is one of my favorite holidays and I think this year there is going to be a lot of glitter happening around here. Just think of all the other fun colors of glitter you can use for the boots or even the socks. More is More! Have fun! Thanks for stopping by today!


Join me again tomorrow for Day 10. I can't believe we are almost to the end. :(
Thanks for visiting and Have a Stampendous Day!
Hugs,
Rachel Siggy

Tuesday, July 26, 2011

12 Days of Christmas / Halloween in July - Day 8

Hi ya! I thought I would bring back an image previously released to mix it up a bit and because it just too cute. The Cling Cutie Bundles Set is so adorable and a great image to color. I also had some extra fun adding lots of White Cotton Ball Fun Flock. It would also make a cute gift tag for gifting a scarf or a pair of mittens. You can even color the image to match your gift. Matchy, Matchy! Tomorrow I will bring your another previously released Halloween image and then we are back to all new images for the remainder of the series. Hope you are having fun!

Supplies:
Stamps: Cling Cutie Bundles Set (Stampendous)
Ink: Memento Tuxedo Black (Tsukineko) and Copic Markers
Paper: Swimming Pool, Lime Crush & Phoenix Dotted Swiss (Bazzill) and X-Press IT Blending Card Paper (Copic)
Accessories: Brads & Ribbon (Best Creation), Piercing Tool (Making Memories), Signo White Gel Pen (Uni-ball) and Foam Tape (Best Creation)

Instructions:
1.) Make card from Kraft cardstock.
2.) Cut red panel and adhere to card base.
3.) Cut blue & green panels, adhere together, pierce around edges and run white gel pen over piercings.
4.) Stamp sentiment onto blue panel and add 2 red brads to each side of the sentiment.
5.) Tie ribbon around blue & green panels and adhere to card base with foam tape.
6.) Stamp image , color, cut, add polka dots with white gel pen and adhere to card base.
7.) Add White Cotton Ball Fun Flock to hat.

Monday, July 25, 2011

12 Days of Christmas / Halloween in July - Day 7

Greetings! Welcome back to the 12 Days of Christmas/Halloween in July - Day 7. Today I have another new Halloween image for you. I love these silly Owls from the Cling Batty Owls Set. I think the sentiment is just hilarious. It's always fun to send someone a card with a funny saying to brighten their day. It just made me smile when I first saw it. I also went batty when I saw how perfectly the Jumbo Bats CAP Stickers would match the image. The velvet feel of the bat stickers is such a great texture. I paired up the image with some of my fav Bo Bunny Halloween patterned paper. I cant' wait for Halloween. It will be here before we know it. Oops... don't hate me for saying that. LOL!


Thanks for visiting and Have a Stampendous Day!
Rachel Siggy

Sunday, July 24, 2011

12 Days of Christmas / Halloween in July - Day 6

Hi! Hope you are all enjoying a wonderful Sunday! Getting this post up this afternoon as I am trying to recover from the County Fair. I think the Fried Kool-Aid may have gotten to me. LOL! So today we are on Day 6 and at our half way point. Wow! It's been so fun sharing all the new Stampendous goodness with you. Today's feature is on a lovely new image called Cling Postcard Pretty and is it ever so pretty. The image really does sparkle with lots of crystal snow glitter on the finished card. I just could not capture it so much in my photo. WOW! I am really loving all these gorgeous vintage images. Creating for this season's catalog was so fun as I got to design out of my normal comfort zone. As you can tell my style is very cutesy with lots of bright colors, but I am completely head over heels for all things vintage. I literally squealed with delight when I saw all these wonderful vintage images and had tons of ideas racing through my head. I think the most fun I had designing with the vintage images was that the distressed look was more freeing. I could crumple, stain and tear my papers. It was great getting my hands all inky. SO FUN! I also water colored many of my images. My sweet friend, Sandra MacLean, helped me so much with some great tips. What she does with watercolors is simply phenomenal, so you will have to visit her blog to see what I mean. Thank you all for stopping by and visiting me today. I hope you love these vintage images too. I will be sharing more of the everyday vintage images with you in August, so stayed tuned for those as well.

Thanks for visiting and Have a Stampendous Day!
Rachel Siggy

Saturday, July 23, 2011

12 Days of Christmas / Halloween in July - Day 5

Happy Saturday! Super excited for a fun weekend! Today I have another Christmas creation for you featuring a truly beautiful image by Stampendous called Cling Manger Scene. I paired it up with the Cling Precious Bundle sentiment. You can do so many wonderful things with solid images. I simply stamped this image, but I think it would look amazing embossed too. Stampendous has added some beautiful new embossing powders to their line. The simple stamping of the solid image makes it a great one to use when mass producing cards. This card came together so quickly. I added a little sparkle to the card by adding this gorgeous glittered patterned paper by Best Creations. I didn't want it to take away from the main image, so I softened it by layering a panel of vellum over it. It worked perfectly to keep the focus on the manger. I really hope you have enjoyed this series so far. Please join me again tomorrow for Day 6 and our half way point.


Thanks for visiting and Have a Stampendous Day!

Rachel Siggy

Friday, July 22, 2011

12 Days of Christmas / Halloween in July - Day 4

Hello! Welcome back! It's Day 4 of the 12 Days of Christmas / Halloween in July. Today I am featuring the super cute Cling Armload Claus Set. It's he just the cutest Santa? I think so! I had a blast coloring him in and adding lots of Fun Flock to his hat and coat. Did you get a chance to stop by the Stampendous site to check out the complete line of new releases? There are so many fabulous new images that I know you are going to love. Not only are there new stamps, but there are new glitters, stickers and mica fragments. Hope you enjoyed today's feature and I will be back tomorrow with more Christmas to share.


Instructions:
1.) Make card from Kraft cardstock.
2.) Cut a panel of blue and red cardstock, stitch red panel onto blue panel and adhere to card base.
3.) Cut panels for blue & green cardstock and stitch blue panel onto green panel.
4.) Stamp sentiment onto blue cardstock panel, add 3 red brads below sentiment and adhere to card base with foam tape.
5.) Stamp image onto white cardstock, color, cut and adhere to blue cardstock panel with foam tape.
6.) Add Cotton Ball White Fun Flock to Santa's hat and coat.

Supplies:
Stamps: Cling Armload Claus Set
Paper: Swimming Pool, Lime Crush, Phoenix Dotted Swiss & Kraft CS (Bazzill) and X-Press IT Blending Card Paper (Copic)
Ink: Memento Tuxedo Black (Tsukineko) and Copic Markers
Accessories: Cotton Ball White Fun Flock (Stampendous), Brads (Creative Impressions) and Foam Tape (Best Creation)
Tools: Sewing Machine


Thanks for visiting and Have a Stampendous Day!
Rachel Siggy

TESC143 - You take the cake!

Howdy Friends! It's FRIDAY! Woot Woot! TGIF! Super excited for the weekend!!! So let's get right to it today with another fun Taylored Expressions Sketch Challenge. I really loved this sketch and had tons of fun making Cuppie Shabby Chic. I was so tempted to bust out the bright colors again. I know I just can't help myself. LOL! I really fell in love with this beautiful patterned paper and I broke out of my routine of bright colors for a special Cuppie card. I used the darling Cuppie with cake image from the Sweet Celebration set and paired it up with this lovely Odds & Ends patterned paper by Cosmo Cricket. I love the shabby look and hope you do too. I think you are gonna have lots of fun playing with this sketch. Come and play along with us this week for you chance at winning a fab TE prize. Check out the Taylored Expressions Forum at SCS for all the details.


We got more inspiration for you. Just hop on over the see the wonderful creations from my Sketch Crew buddies and our fabulous guest designers.

Thanks for visiting and Happy Friday!
Rachel Siggy

Thursday, July 21, 2011

12 Days of Christmas / Halloween in July - Day 3

Hi Friends! I'm back with a quick post today for the 12 Days of Christmas / Halloween in July. I hope you are liking the sneak peeks so far. The complete line is now available to view & purchase on the Stampendous website here. So go check it out! You are gonna love what you see! Today's card features the adorable Cling Spooky Treat Set. I fell in love with this super cute ghost and had fun creating this Halloween card. I'll be back later tonight to post the instructions and supply list. Also wanted to let you know I will be offering up some BLOG CANDY at the end of this 12 Days Series. Hopefully my little ghost friend won't be eating it. LOL! So stay tuned for that too! Please join me again tomorrow for another Christmas creation.

Update!
Instructions:
1. Make card from Kraft cardstock.
2. Cut panel of black/kraft polka dot paper and adhere to card base.
3. Die cut scallop circle mat from black cardstock and pierce a hole in each scallop.
4. Stamp image onto white cardstock, color, die cut (circle) and adhere to black scallop circle mat.
5. Adhere image to card base with foam tape.
6. Stamp sentiment onto green patterned paper, die cut (circle), trim off bottom of circle and adhere to base.
7. Add button to top of sentiment with a glue dot.

Supplies:
Stamps: Cling Spooky Treat Set (Stampendous)
Paper: X-Press IT Blending Card Paper (Copic) and Patterned Paper (Canvas Corp & Bo Bunny)
Ink: Memento Tuxedo Black (Tsukineko) and Copic Markers
Accessories: Circle and Scallop Circle Dies (Spellbinders), Button (Cosmo Cricket), Foam Tape (Best Creation), Piercing Tool (Making Memories) and Zots Glue Dot (Therm-O-Web)

Thanks for visiting and Have a Stampendous Day!
Rachel Siggy

Wednesday, July 20, 2011

12 Days of Christmas / Halloween in July - Day 2

Hello again! So how did you like Day 1 of the Stampendous 12 Days of Christmas / Halloween in July? Are you ready for Day 2? I thought I would share with you one on my favorites. Hmm... they all seem to be one of my favorites. Sorry I can't help it. Ok, let's call this one my CAS favorite. If you are anything like me you will be up all night stamping your Christmas cards to get them out on time. Well this card is going to be my secret weapon this year. Nothing beats a clean and simple card when you are mass producing cards. The darling new Cling Secret Santa image and Cling Christmas Greetings sentiment come together perfectly. Wow, there is still so much more to show you! Please join me again tomorrow for another exciting Stampendous reveal.


Instructions:
1.) Make card from cardstock. 2.) Stamp Santa onto Kraft cardstock with red ink. 3.) Stamp Christmas Greetings sentiment onto cardstock over Santa image with black ink. 4.) Die cut image / sentiment out. 5.) Cut panel of red polka dot patterned paper and adhere to card base. 6.) Adhere die cut image / sentiment with foam tape to card base.

Supplies:
Stamps: Cling Secret Santa & Cling Christmas Greetings (Stampendous), Ink: Versafine Onyx Black (Tsukineko) and Cranberry Pigment Ink (Color Box), Paper: Kraft Cardstock (Bazzill) and Patterned Paper (Canvas Corp), Accessories: Labels 8 Die (Spellbinders) and Foam Tape (Best Creation)

Thanks for visiting and Have a Stampendous Day!
Rachel Siggy

TE Blast from the Past Blog Hop - Key Ingredients Style!

Hello! Happy Wednesday! I'm already looking forward to the weekend! Going out to the County Fair for some fun and great eats! It really feels like summer now. The Sending You Sunshine theme for this month's TE Blast from the Past Blog Hop couldn't be more perfect. Summer always reminds me of getting outdoors and playing until the street lights came on. The long summer days meant I could stay outside riding my bike until 8pm. Oh how I loved being outdoors just soaking in the sun! So when I was thinking of what stamp set to use for the blog hop I immediately remembered that darling image of Cuppie and friend in a hot air balloon from the Cuppie Love Scenes set. Who wouldn't want to be flying around soaking in those sun rays and drifting through that delicious summer air? I also got some additional inspiration for the pattern I wanted on the hot air balloon from the sweet patterned papers from the July Key Ingredients Kit. I can't tell you enough how much fun I have been having creating with this month's kit. All the cardstock and patternd papers used for my card were from the kit and there is still plenty more for me to continue creating. Are you loving this kit too? Well be sure to check out the subscription details here. It really is a great value for such fabulous products.

Ready to see more? Be sure to hop along and visit the rest of the Blast from the Past hoppers to see their fab creations. Do you love Taylored Expressions too? Well you will have to join us for next month's hop. You can get all the of the details here. We would love to have you join in on the fun!


Thanks for visiting and Have a Great Day!
Rachel Siggy

Tuesday, July 19, 2011

12 Days of Christmas / Halloween in July - Day 1

Hello Friends! Super excited to finally be able to share with you the creations I have been working on these past months for the Stampendous July 2011 Catalog. The catalog is being revealed this week at CHA, so I thought I would bring a bit of the reveal to those of you who could not attend. I had a blast working on samples for the catalog and booth for CHA. The new Stampendous images are AMAZING! So let's get the party started with a couple of my favorite new images - Cling Eiffel Noel and Cling Poinsettia Silhouette. Do you notice that sparkle on the poinsettias? It's from the brand new Champagne Glass Glitter by Stampendous. Love it!!! I had so much fun with this card. I really enjoyed all the distressing and embossing. I just love how the embossed Poinsettia image in the background peeks through. I hope you enjoyed today's card. Please be sure to stop by tomorrow for another reveal. Let me know what you think of these new images too.


Instructions:

1.) Make card from cardstock. 2. ) Stamp poinsettia onto cardstock panel with Versamark ink and emboss with clear embossing powder. 3.) Stamp Eiffel tower onto cardstock rectangle, color with markers and tear edges. 4.) Wrinkle both cardstock panel and rectangle then distress and ink edges as desired. 5.) Adhere panel to card base and tie ribbon bow. 6.) Adhere rectangle to panel with foam tape, glue glass glitter to center of flowers and spray with shimmer.

Supplies:

Stamps: (Cling Eiffel Noel, Cling Poinsettia Silhouette) Stampendous, Cardstock: (Baby Pink, Cream Puff, Kraft) Bazzill Basics Paper, Ink: (Versafine Vintage Sepia, Versamark) Tsukineko, (Vintage Photo Distress Ink) Ranger and Dual Brush Pens (Tombow) Accents: Champagne Glass Glitter (Stampendous), Sparkle Sheer Shimmer Spray (Tsukineko), Ruffle Ribbon (May Arts), Adhesive: 3D Foam Tape (Best Creation) and Quick-Dry Adhesive (Scotch)

Thanks for visiting and Have a Stampendous Day!
Rachel Siggy

Monday, July 18, 2011

iCopic Weekly Challenge #39 - Congrats!

Happy Monday!!! Did you all have a wonderful weekend? Mine was great and I was so happy to have such a nice relaxing Sunday. I am back to share with you another fab iCopic Weekly Challenge. This time up the challenge is to only use pastel colors. What a great one for me this week as I have a few friends who are expecting. So excited for my friends and happy to get a lot of use out of this adorable Plus One set by Lawn Fawn available at iCopic. The images are all so sweet and if you missed my previous iCopic Challenge Card using Plus One you can check it out here. I love CAS cards and since the image is so cute I wanted to focus on it. I stamped the image & sentiment onto X-Press IT Blending Card Paper using Memento Tuxedo Black Ink. This cardstock is fantastic for coloring with Copics. I colored in the image using the following Copic colors: Moon (Y11,Y13), Small Star (BG000, BG01) & Large Star (V000, V01). Next I die cut the image & sentiment out along with a matching blue mat. I embossed the bottom layer of plum cardstock with dots and adhered it to the card base. I added my layers onto the plum cardstock with foam tape and added the ribbon bow to the base. I finished off the card with some sparkle by adding a clear gem & glitter to the image.

Are you ready to try your hand at the Pastel Challenge? I have been seeing some AMAZING challenge creations over at the iCopic Blog. You guys ROCK!!! I can't wait to see what you come up with for this one. As always iCopic is offering up a chance to win a terrific prize for this challenge. To get all the details and to enter please visit the iCopic Blog.

Thanks for visiting and Have a Great Day!
Rachel Siggy

Rachie's Recipe:
Stamps: Plus One (Lawn Fawn)
Ink: Memento Tuxedo Black and Copic Markers
Paper: X-Press IT Blending Card Paper, Lavender Moon & Lemon Tart CS (PTI) and Patterned Paper (Memory Box)
Accessories: Stardust Stickles, Clear Gem (Kaiser), Labels 8 Dies (Spellbinders), White Gel Pen and Foam Tape (Best Creation)

Thursday, July 14, 2011

Stampendous and May Arts Week!

Hello Friends! This week Stampendous and May Arts have teamed up to bring you a week long of inspiration and prizes. Check out this post at the Stampendous Blog for the full details on how you can win a fabulous Stampendous/May Arts prizes. The Stampendous Blog, May Arts Blog and the Design Teams will be featuring creations all week long. Please be sure to stop to see all of their lovely creations. I thought I would bring you a little Christmas in July which is also a sneak peek of the wonderful new Stampendous releases which will be available after July 18th. I used the brand new Cling Postal Pair, Cling Postal Greeting and Cling Music Score. I LOVE LOVE LOVE the vintage look of these new stamps. They were a joy to play with and the images are just beautiful! I think what really made the card complete was that gorgeous Crinkle Ribbon from May Arts.


Instructions:

1.) Make card from cardstock. 2.) Stamp music score and sentiment onto square cardstock panel, lightly smear ink, wrinkle panel then distress and ink edges. Adhere panel to card base. 3.) Stamp vintage postcard image onto cardstock rectangle, watercolor with markers, tear and ink edges. 4.) Gather wired ribbon to create ruffle and adhere to back of cardstock rectangle then adhere to panel with foam tape. 5.) Apply glitter to coat trim and muffler on stamped image.

Supplies:

Stamps: (Cling Postal Pair, Cling Postal Greeting, Cling Music Score (Stampendous), Cardstock: (Baby Pink, Cream Puff, Kraft) Bazzill Basics Paper, Ink: (Versafine Onyx Black) Tsukineko, (Vintage Photo Distress Ink) Ranger and Dual Brush Pens (Tombow) Accents: Fine White Crystal Snow Glitter (Stampendous), Crinkle Ribbon (May Arts), Adhesive: 3D Foam Tape (Best Creation) and Quickie Glue Pen (Sakura)

Thanks for stopping by and Have a Wonderful Day!

Rachel Siggy